Party Time: A Super Mario Birthday
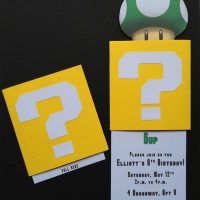
Elliott LOVES Super Mario Bros., so there was no better way to celebrate his 6th birthday than with a Super Mario party. The invitations were double slider cards based on this tutorial by thenorsugirl. A little pull on the card and the 1UP slides out.

For decorations, yellow plastic plates, hot glue and fishing line became a coin garland. Yellow and maroon wrapping paper helped turn boxes into coin and bricks blocks , which were also used for a party game. Balloons and white labels turned into chomps and piranha plants. The fabric backdrop was inspired by the one made by Chica and Jo and we used the amazing goomba template from their site.

For the snacks and treats, we used containers that looked like Super Mario items. Round boxes were painted green to look like the pipes in the game. Juice boxes were wrapped in the same maroon paper as the boxes and stacked to look like brick blocks. And mini coin blocks were created with card stock.

Treats included piranha plant pops, chips, a Mario cake from Cupcake Cafe and

amazing cake pops from Pop-N-Stuff NYC. (Full disclosure: Rita is a friend, but the fact that these are the first Mario-themed pops she’s ever made show how amazing her work is.)
")
For activities, the kids played “Chomp Bop,” which was just the kids running around keeping the Chomps off the ground and also bopping each other with balloons.

Next, the kids played “Pass the Power-ups” by breaking up into two teams and using spoons to pass each other little wooden mushrooms.

To calm them down a bit, the next activity was “Design a Mario Kart.” The kids quietly decorated wooden cars with markers.
 The next activity was Musical Mario Blocks. We used the brick and coin blocks for the kids to sit on and the music was the Super Mario theme song.

Finally, they played “Pick A Coin” where they picked a “coin” that contained a Super Mario character figure.

Then it was time for cake!


This is amazing, totally stealing ALL your ideas for my next party!
Merci pour toutes vos idées. Mon fils de bientot 4 ans adore Mario , j ai donc choisi ce theme pour sa fête d anniversaire. En France, on ne trouve que peu d idées sur Mario !
Euh je vais tenter en anglais lol
Thanks for yours ideas. My son like Mario and for this 4th birhday i choice this theme . In France there are not idea on Mario.
Sorry for my english .
Hi, I wanted more info on the invites. Did you just find pictures online and use them, or is there a template available?
I just found images online and enlarged them to the size I needed.
The chomp balloons – did you make those yourself?
Yes, I cut circles for the eyes and a crescent/smile shape for the mouth. I drew in the pupils and teeth. Black cardstock rings made up the chains.
I love the Musical Mario Blocks game! What kind of boxes did you use that were sturdy enough for the kids to sit on them?
Thanks! I ordered 10x10x10 boxes from Uline. To make them sturdier, I used two pieces of extra cardboard in an X shape inside the box.
Pingback: 5 Uniquely Awesome Birthday Party Themes | CreateventsCreatevents | Every milestone is worth celebrating
Brilliant and inspiring!
in love with the invitations. will definiely make them for my brothers party. what are the measurements of the card. i saw the video on youtube and her card seemed a little too more like a rectangle rather than a square like yours. thnanks.
Thanks! The coin block was 3.5″ x 3.5″, the interior card was 4″ x 3.25″ and the mushroom is 3″ across. If you use a 8.5 x 11 sheet of card stock, you should be able to fold it into thirds with a little bit left over for a tab to glue it shut. Hope that helps!
Hi I am planning a party for my son how did you make the plants and how did you create the covers for the coin and brick boxes.
The coin and brick blocks were just 12×12 boxes wrapped in yellow and maroon wrapping paper. I drew the brick lines with Sharpie and cut the question mark out of regular paper.
Wonderful job..thank you so much for sharing!!!
how did you make the plants ? 🙂
The tubes were regular mailing tubes wrapped with green paper. The leaves were made with the same paper.
Red balloons were tied with ribbon which were then threaded into the tube and taped at the bottom. Glue dots on the edge of the tube gave extra hold to the balloons.
The dots and teeth were cut from mailing labels and the lips were made from folded felt to give a 3D effect.
Hope that helps.
Thankyou so much!! this is a really cool idea , im going to try it this april 🙂 !!
Love this! What did you use as the green bowls/cake stands? TIA!
And also, where did you get the wrapping paper from? Thanks again!
The yellow paper is from Party City and the red was from T.J. Maxx.
Thanks! I used round paper gift boxes and painted them green. I flipped the lid over and lined it with foil to hold the snacks.
Michael’s may have some. Otherwise, try these two:
http://search.save-on-crafts.com/search?keywords=Round+boxes
http://www.shoppingbags.com/store/home.php
Im in love!!!! The invitations are perfect. I wish you have you own video how to make it. Or at leas picture step by step. Thanks
My son spotted your mushroom double slider invitations and loves them! Any chance you have a more detailed template? I fear that my scaling will be off….the video is very helpful but was hoping for more details on dimension.
Any help would be truly appreciated!
Meaghan
I didn’t really use a template. I just knew that the block had to be square and that I wanted to use a standard invitation envelope. The measurements I went with are:
3.5″ x 3.5″ for the coin block
4″ x 3.25″ for the interior card
3″ across for the mushroom
3″ across for the question mark
If you use a 8.5 x 11 sheet of card stock, you should be able to make two cards that is folded into thirds with a little bit left over for a tab to glue it shut.
Hope that helps!
Thank you so very much! If I could upload a picture, I would….I made 22 of them and they came out great! It was time consuming but a lot of fun…thanks for your great ideas!
So great to hear that! Good luck with the party!
Thanks so very much for the inspiration – I made your invites and chomp balloons for our own party yesterday and they were such a hit! I changed the invites a bit and blogged a full tutorial of what I did, but I just wanted to say thank you. 🙂