All About the Packaging: Candy Button Punch Box Tutorial
We created this punch box to use for the Candy Button Trivia game we played at our Maddie-licious party. It’s pretty easy but does take a little bit of time.
You’ll need:
4 white poster boards
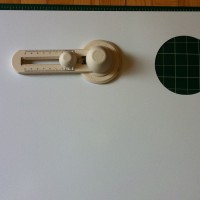
a circle cutter
tissue paper in the colors of your choice
glue
18 paper lunch bags
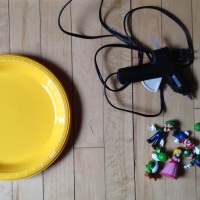
prizes
packing tape
ribbon
First, start cutting circles on your poster board. We set our circle cutter to 5 inches. This let us make three columns of three circles each per poster board. You can choose to make smaller or larger circles.

Your poster board will look like this after you’ve finished.

Repeat the process on the second poster board. Now start cutting out the tissue paper and gluing the squares over each circle. We cut ours into 6×6 inch squares as our circles were 5 inches.

We recommend cutting individual squares since punching out one hole may pull the paper off the others. Once you have all the circles covered, tape them together to form one long strip. You should then have something that looks like this.

Next, take the remaining two poster boards and cut them in half length-wise.

Then fold each piece in half length. These will be the side panels of the punch box.

Lay the smooth side of the poster board (the edge you didn’t cut) next to the poster board with the cut-outs. Line up the top edges and tape together.
")
Next, take your lunch bags and cut off the top 6 inches. (We saved the tops and made small snack bags by gluing and folding the bottoms shut.) Take the bottom half of the bag and start making 1 inch cuts along the top and then fold them over. These tabs will be what you use to tape them down. Repeat with all the bags.
")
Lay out the board and place a prize on each circle so the prizes are evenly distributed. Then cover each one with a paper bag and tape down.
")
Once all the bags are attached, fold over the side panels to cover the bags. You may have to tape the side panels together across the back. Thread some ribbon across the top, hang it up and you are ready to go!


Did you have a game to play with this? Or did everyone just get a turn to break one open? I love this idea! It makes me think of the Price Is Right!
We used it to play a candy-themed trivia game. Everyone answered a question and got to pick a “button” to punch.
Great idea – could also be adapted to be an advent calendar…
That’s a great idea, too!
Funny, my husband and I just made a very similar game, but it was out of a large flat cardboard box that lay on the floor. He segmented it into little squares with cardboard, each square got a prize, then we did an overlay of paper. It was for my son’s third birthday–pirate themed. The kids went on a treasure hunt that ended for them “digging” a prize out. This is a great idea, too!
Really fun project, and I love the idea of making an advent calender, or a countdown to any special day.
Hello Advent Calander!
I’m really wishing I had that tool to cut out big circles! I need to make this by Saturday for my son’s second birthday. The polka dots will go GREAT with our Hungry Little Caterpillar theme!
It’s the Martha Stewart circle cutter available at Michael’s. So handy!
I just made one, and found a small bowl to trace, then cut the circles with exacto knife and it was easy & quick. Making for my 9yr olds sleep over. I think they’ll love it!
I use a glass or mug and trace around it then cut them out with sissors
Thank you SOOO much for the pictures! A very helpful and easy to follow tutorial, I think even I can do this 😉
I had so much fun making this! It was very easy to follow. My advice is to make sure you have at least 3 FULL rolls of scotch tape- i ran out. The Kids are excited to tear it up!!
I recommend having the kids earn tickets and then 5 tickets=1punch if they do something good or are quiet they will get a ticket or play a game and earn tickets!!!!
Great idea! I wish I’d seen this before my daughter’s party last week!
This is such an amazing idea – just finished assembling ours for a party on Saturday.
We had a giant cardboard box, so I glued the cardstock to that, and then cut through the cardstock and cardboard – it stands on its own!
The stand-alone idea is great! We’d love to see a picture.
I used this idea as a classroom management tool right before Christmas. I created a Christmas tree instead of the straight panel, and instead of “candy” themed prizes, the circle pouches were filled with reward ideas for the kids and good behavior. It was fun, and thanks for the great idea!
What a great idea!
Love that idea too!
I used this for my daughters rainbow 4th birthday party. The kids LOVED to punch their prize as they left the party. The parents were pretty impressed as well. Thank you for the tutorial!
We just thinking of using this for my daughter’s rainbow 4th birthday party too! Funny, and I will defiantly try it:)
Pingback: Sierra’s Birthday Party (take two) « A day in the life of the Wu’s
Thanks so much for this! We had one for our daughters’ 2nd and 4th birthday party this past weekend. It was a Christmas theme, so we did Christmas trivia to go with it. The kids LOVED it, and it was so nice to have a party where a kid or two wasn’t in tears after being trampled going for the pinata prizes!!
Thank you so much for this tutorial! I made this for my daughter’s 5th birthday party this weekend. It was a HUGE hit! Some of the moms were wanting me to make it for their kids’ parties 🙂
Thinking about using this for valentine’s day party at school.. Maybe call the game “heartbreaker” with Hearts(cut with exacto knife) and red and pink tissue paper. Thanks for sharing. I think the kids will get a real kick out of this if I can execute it 🙂
What a great idea! We’d love to see pictures of the finished game.
Wonder if it would be a bit easier to glue rather than tape?
Absolutely! We just ended up using tape because we were worried that some of our heavier prizes wouldn’t stay put with from the game being hung up and the movement from the poking.
Oh my gosh!! I love this!! I would totally feel like being on Price is Right!! So much fun! Thanks for sharing!!
what were your questions you asked
thanks
Here are some sites where we pulled some of our questions. We also changed the format of the harder ones into multiple choice to make it easier for younger guests.
The 10 Spot Candy Bar Trivia
http://www.stylemg.com/Style/February-2011/The-10-Spot-Candy-Bar-Trivia/
Sweet Trivia
http://freshare.net/article/sweet_trivia_questions_and_answers_by_deanna_mascle/
Thank you, I love this idea! I was looking for something besides a pinata that they could get a prize, but was easy, since they’re in Kindergarten. Yeah!!
Brilliant. I just saw someone else share a tutorial…inspired by your tutorial. Sometimes, though, there is no reason to reinvent the wheel when it was done so perfectly the first time. Your tutorial is AMAZING. I am pinning this and hope to be ambitious enough to try this for my daughter’s birthday party.
Amy @ whilewearingheels.blogspot.com
I love it!
i love it, im considering using this as a idea for a prize picker instead of lucky dip for my party in september… thanks!
Thanks for the great idea!!!! I need squares instead of circles and I’m thinking about using square Kleenex boxes instead of bags… Can’t wait!
What a great idea to use Kleenex boxes!
Mine is almost done. It has been time consuming, but fun. I filled mine with alot of misc small things found in the party isle at walmart. I bought pink polka dotted tissue paper for ones with girly surprises in them, and blue polka dotted tissue paper for ones aimed more for boys. Can’t wait to see if the kids enjoy ruining it as much as I enjoyed making it! 🙂
Cute idea with the paper!
We are having a 5th birthday party for my daughter this weekend, which is candy themed. I followed the directions and it looks like Dot candy! We are going to play basically “hot potato”, but with a small hershey’s kiss pillow. Whoever ends up with the “kiss” is whose gift my daughter will open and then that child will get to punch out their prize! Can’t wait! Thanks for the idea!
Just wondering how the ribbon held it??
Cute idea! A ribbon was threaded through two holes on each side and taped to the box on the inside with packing tape. The tape reinforced the holes and kept the ribbon from pulling too much. It stayed up from the beginning of the party until the very end.
Happy birthday to your daughter!
i really love this idea to get everyone involved….
Making one now with train cars instead of circles for my son’s train-themed party on Sunday. Thanks for the idea!
What a cute idea!
I made this for my daughter’s 15th birthday party. The theme was candy and balloons. I made this board, and instead of putting prizes in the bags, I put slips of paper with point values, and some holes had point values and a bonus punch again tickets. I made up a candy trivia game. The kids loved it..
going to use this idea at a sleepover with the trivia theroy, and a rainbow theme, really like it will post the hit afterward.. and possible pics too 🙂 thanks for sharing
I made this for my daughters 4th birthday this past weekend. The little ones loved this! I think it was more exciting for them than a regular pinata.
Pingback: PUR|Lee Creative
I have been looking for some new ideas for my daughters 3rd birthday party and this is such a great idea. Thank you for sharing the tutorial, am definitely doing this. I think it will be fun
I’m making one for my son’s super hero party. I’m going to write pow and blam on the tissue
circles!
Great idea!
Thank you so much for the idea and tutorial 🙂 We are using it as an incentive to potty train our 3 year old! So far, so good!! I’ve even punched out a few after using the potty. The bonus is you have to wash and DRY your hands, which he never does because he is always in a rush to get his reward. Love it!
What a great idea! Hadn’t thought of using it as an incentive.
How heavy can the stuff be thats inside??? I just have little bags of candy but i’m nervous to set it up a few weeks in advance b/c i dont want it to rip or break!
It depends on the kind and amount of tape you use. I used packing tape and it held some pretty heavy items.
Pingback: Neverland Birthday Party « kidssakes
WOW! SO fun. I’m having a cupcake party for my 12 year old girl, and we are going to make the holes shaped like cupcakes with a light pink board instead of white. Thanks for the inspiration!
Cute idea!
How long did it take to make?
It took me a little over an hour (hour and a half max).
I’m using this idea for my daughter’s candyland carnival birthday party! The board looks like a strip of “candy dots” candy. Thanks so much. This is awesome.
I want to make this for my daughter’s bday party. THey are teen girls and I am thinking of color matching nail polish and a file to the color outside. Would the bags hold nail poilsh and a file?
You may need a little extra tape, but it should hold nail polish and a file with no problems.
Do you have any ideas on how to make it stand? I dont have anywhere to hang it up. LOL!
You might try using foam core board for the sides and back of the punch box and just use poster board for the front. That might enough support to allow you to stand it up against a wall.
Thanks! I was going to use cardboard along the back in a triangle shape to see if it will stand. I am using it at my sons 5th birthday instead of a piniata.
This is the best game idea ever!! I’m going to make one to use in Sunday School this weekend with trivia questions. Thanks for the GREAT idea!!
Heidi
what are the dimensions? I love the idea!!
Thanks! The circles are 5 1/2 inches across. I just used two 22×28 inch poster boards, so the game I made was 22×56.
Pingback: Ideas DIY para el verano con niños | El blog de Wendolyn Cook
Pingback: Rainbow Punch Pinata » Diapers n Heels
I making this for my son’s super hero party this weekend. we’re going to make it with squares instead of circles to make it look like windows on a building!
That’s an awesome idea!
I love this idea! I’m adapting it a bit to make a “pop the tire” game for my sons Hot Wheels party. Thanks for the pics and tutorial!
That sounds fantastic!
Using it for my daughter’s Lego party using yellow poster board and yellow tissues to looke like giant Lego. Inserting slips of paper with “prize”, “punch again”, and various silly activities (sing happy birthday in a silly voice, dance Gangam style, do the crab walk the length of the room,etc). Thanks for the tutorial!
Love the activities idea and the LEGO theme. How fun!
Pingback: Help Minstuck provide birthday parties to children living @ her local womens shelter - Page 6
I pinned this a long time ago and I just made one for a Candy Land Party. I used cardboard and solo cups instead of paper bags – slid them in through the front of the hole and then covered the hole with the tissue paper. I used the poster board with the same holes cut and hot glued on the front to cover where the tissue paper was taped on. Thanks for the great idea!
What a great idea! Thanks for sharing!
Pingback: A Lego Party | adairyadesigns
Hi, I’m not exactly planning someone’s party- because MINE is coming up!!!!!!!! I’m eleven and on November 15th I’m gonna be twelve. I LOVE this idea, but do you think it would be okay for my age?
Absolutely! I know most of the adults who saw the punch box wanted a turn, so I think it would be totally appropriate for your party. Happy early birthday!
So cool. I’m thinking plastic gardening pots for the back….Or sticking a bunch of tissue boxes together.
Those are great ideas! Thanks for sharing.
I love this idea! Planning my granddaughter’s 1st birthday…The theme is China since her name is Chyna….I just love unique ideas because the pinata is old…Thanks for sharing and explaining step by step how to do game….Counting down to party.
Pingback: Candy Land Birthday PartyThe Shopping Mama
Pingback: Day 68 – Project 365 Pinterest: My Little Pony Themed Birthday Punch Wall | Cindy Parrett
Thanks for the great idea. I adapted this for a boys’ Ninja Halloween party last fall. I made Ninja faces from construction paper to cover the holes with little ninja figures from OT as prizes and had the boys practice their strike skills on the board as a Ninja training exercise. The boys went wild – the board (I used a cardboard trifold display board since it was slightly sturdier) was completely decimated by the end of the game!
That sounds so fun!
I’m actually going to use this for prizes for a bridal shower I’m planning, and have it be part of a “tacky veil” game, where if they say a certain word (bride, groom, wedding, etc…) they add something to a veil and make it look tackier and tackier and this way they dont get to pick what to add….its just the luck of the punch 😉
Pingback: 61 Birthday Party Games & Activities | Kingdom First Homeschool
Pingback: How to Make a Party Surprise Punch-Through Game ‹ The Art of Heart & Home
Love this! I am in the process of making a Slenderman themed one for my son’s Creepy Costume party this Sunday. 🙂
Pingback: Rainbow Punch Pinata - made with HAPPY
Pingback: Party on down: Games
Pingback: Party on down: Games | Maxabella Loves
Pingback: Party on down: Games
Pingback: Dollar Store Series- EET/describing vocabulary | letsbabbleon - A place where babbling is a good thing!
Pingback: The Punch Poster: 12 Days of Christmas
Pingback: D.I.Y: Adventskalender « KiWeZ KiWeZ
Pingback: 15 Rainbow Party Ideas to Make Your Party Shine | How Does She
Pingback: 10 Best Party Games for Kids
Pingback: Easy DIY: Pokeball Punchbox | Celebrate the Big & Small
Pingback: Step Up Your Party Favor Game With a Punch Box - BuzzDelta
Pingback: Step Up Your Party Favor Game With a Punch Box — Viral Pie
Pingback: ABC End of the Year Countdown | My Attempts at Being Creative!
Pingback: Candy Button Punch Box - nextlevelkidmin.com
Pingback: I’m Planning My Kid’s Birthday Party – HELP! (Part 2 of our birthday party planning tips) » Sprog and Sprocket
Pingback: 15 Rainbow Birthday Party Ideas | Fun Party Ideas for Kids
Pingback: DIY Cupcake Holders - All For Garden
Pingback: I followed this tutorial to make a simple carnival game for the kids. blog.celeb… | 1000 – Modern
Pingback: Rainbow Love - Spoonflower Blog